It’s getting that time where we are all done with the snow (although we don’t get it here in Alabama) and ready to start thinking about some spring projects. Yarnspirations is amazing and gave me this awesome paid sponsored post where I could share with you the Happy Gardening Rug using the Lily Sugar’ n Cream yarn. It’s actually my first Box stitch or also known as the Corner to Corner stitch design. I have to admit that I really loved working on the graph and learned quite a few things along the way.
I would also like to extend a big thank you to The Potting Shed in Auburn. Heath Davis is the owner and gave me permission to use his amazing garden center to do the photography. It was SO much fun taking all the pictures in different angles not to mention all the beautiful flowers and plants surrounding me. It’s definitely a place I’ll have to frequent when I start my planting.
I can totally see this rug being used in your garden area where people gather to sit around, drink tea and have beautiful conversation. I am thinking of trying to create some type of space like this and think it would be a blast. Maybe a little at a time right?

As I mentioned, the Happy Gardening Rug is made using the Sugar n’ Cream yarn that is 100% cotton and durable enough to create this beautiful piece. You’ll love the graph that’s also included and just in case you didn’t want to say “Happy Gardening” in your rug, I designed one just for you that says, “Welcome.” I thought it would allow you a great choice on what you’d like to crochet. What would be your colors you would choose for your rug? Be sure to check all of them out and use your 20% discount.
Supplies:
- Lily Sugar’ n Cream, #4 Worsted Weight Yarn, 100% Cotton, 120 yards/71 grams. (See below for number of skeins needed).
- Hook: E/3.50mm
- Tapestry Needle for weaving in the ends.
Color 1: Teal (5 skeins)
Color 2: Tangerine[4 skeins]
Color 3: Hot Green [1 skein]
Color 4: Hot Pink [1 skein]
Color 5: Yellow [1 skein]
Color 6: Hot Purple [1 skein]
Gauge: 7 x 7 block = 4″
Finished Measurements: 46.5″ x 22″
Abbreviations:
ch – chain
dc – double crochet
sl st – slip st
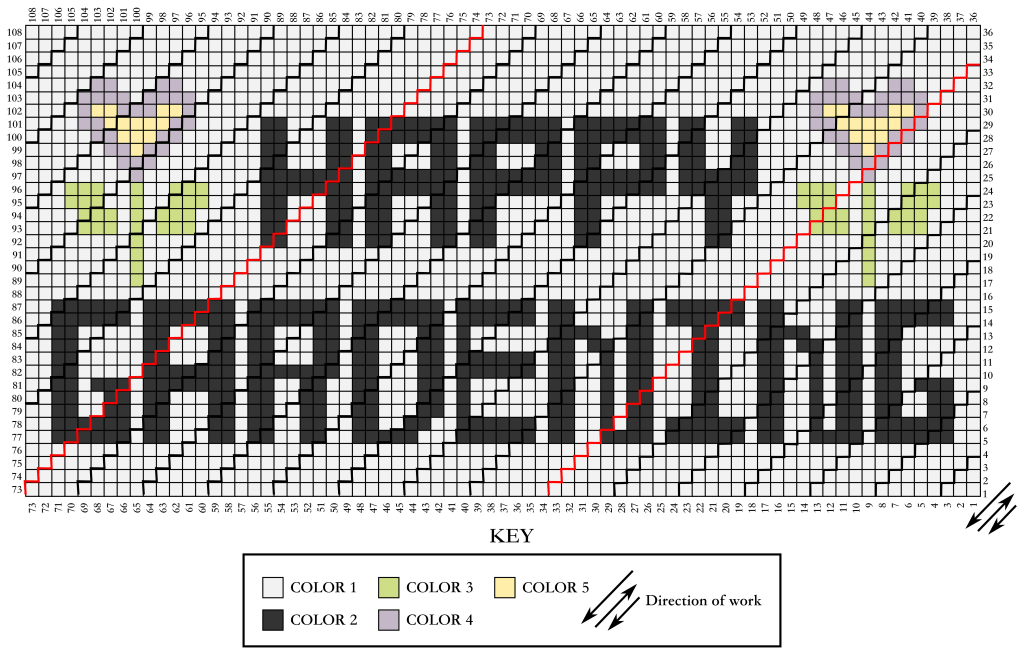
Pattern Notes: This pattern is a rectangular pattern, so you will begin decreasing the top of the graph pattern while still increasing the bottom of the pattern. Just keep in mind the top starts decreasing at Row 37. You won’t start decreasing the bottom until Row 74. It will be at that time both ends will start decreasing.
Here are the written instructions to get you started.
Row 1: Ch 6, dc in 4th ch from hook, dc in next ch, dc in last ch, turn. (1 block made)
Row 2: Ch 6, dc in 4th ch from hook, dc in next ch, dc in last ch, sl st in ch-3 sp, ch 3, 3 dc in same ch-3 sp, turn. (2 blocks made)
Row 3: Ch 6, dc in 4th ch from hook, dc in next ch, dc in last ch, *sl st in ch-3 sp, ch 3, 3 dc in same ch-3 sp, repeat from *, turn. (3 blocks made)
Continue working the pattern using the written instructions in Row 3 along with the graphs below for color changes. See the Pattern Notes for where to begin the decreasing rows.
Decrease Rows: Sl st in each dc across to next ch-3 sp, sl st in ch-3 sp, ch 3, 3 dc in ch-3 sp, turn.
Last Row: Sl st in each dc across to next ch-3 sp, sl st in next ch-3 sp, 3 dc in same ch-3 sp, sl st in last ch-3 sp. Fasten off. Weave in the ends.
Here is a stitch diagram for both the right and left-handed crocheter.


I’ve done the graph in two different colors for you. You can download the black/white and color graphs as to which one works best for you.
Happy Gardening Rug BlackWhite Version PDF
Happy Gardening Rug Color PDF by ELK Studio 
Would you like to use the Welcome Rug Version?


Be sure to be on the lookout for the video tutorials coming soon! If you need help before then just send me an email or don’t forget you can join the ELK Studio Crocheters Group for help!
I hope you’ll enjoy this pattern. It would mean a lot to me if all the ELKies would tell Yarnspirations how much we appreciate them sponsoring us.
This is a paid sponsored post. All opinions are my own.


